Friday, February 6, 2015
RGBY LED PAR fixture teardown
I've been interested in using LEDs for architectural illumination so I obtained some of these LED PAR† fixtures from Aliexpress
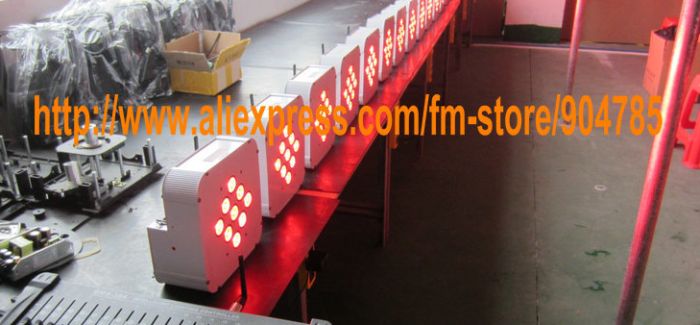
They are crazy bright (90 watts of LED power), reasonably inexpensive (a little more than $100), well built, with wireless DMX control. However the reason I bought them is they have an extra color channel: high-brightness amber-orange LEDs in addition to the customary red, green, and blue LEDs. This increases the color gamut: the range of colors achievable by mixing light from the different channels.
I call the orange/amber channel Y (for yellow) to avoid confusion with colorspaces with an alpha transparency channel. Last week I posted how to compute RGBY values from a hue-saturation-value (HSV) color space see that for details.
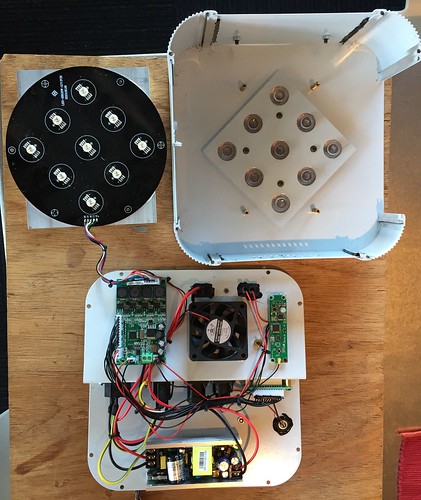
So let's take it apart and see what's inside. It's sturdily made: steel side plates slide into extruded aluminum corners, firmly attached with a seemingly excessive number of screws. I reckon it could withstand a serious fall without major harm. (Not having fragile incandescent bulbs is a big win here.)
Here you can see the major parts: I've unscrewed the front and flipped it over towards the top of the picture. In the back of the case is the PSU (at bottom); the slim PCB to the right is the wireless DMX module; the bigger PCB on the left contains a microcontroller and the four LED drivers for each color; the LEDs themselves are on a big circular PCB at top left, and the LED lenses are held in by a plate screwed inside the front cover at top right.
Though we will see it is eminently hackable, the only modification I've made so far is to disconnect the fan; although likely useful in a hot stage lighting environments, it was was annoyingly noisy for a residential installation. (At full power white the LEDs can run hot without the fan, but for my application I will rarely if ever use more than 50% power and they don't seem to get uncomfortably warm.)
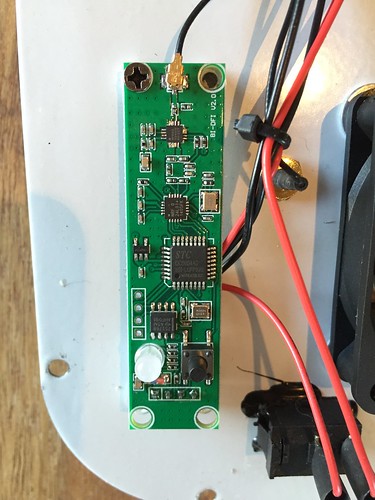
Here is the wireless DMX module. It's just patched into the wired DMX inputs. It can be configured as master or slave which is handy: you can hook your DMX control cable into one unit and configure the others as receivers which can save a lot of wire running! The wireless DMX really works well, perhaps too well: it's in the 2.4 GHz band and tends to stomp all over your wifi! I couldn't find any specs on the RF protocol but since it's generated by a to a nRF 24L01+ 2.4 GHz transceiver it's likely not too hard to sniff. Another annoyance is that when the unit is not receiving wireless DMX it reverts to the preprogrammed color setting. It would be much handier if it retained the last color; as it is you need to constantly transmit the wireless DMX signal for any other color than the preset. On the PCB, the microcontroller is a STC 12C5604, a 8051-compatible MCU popular in China, hooked to a nRF 24L01+ 2.4GHz transceiver. The IC between the 24L01 and the antenna is I think an (off brand?) SE2620T wifi front end.
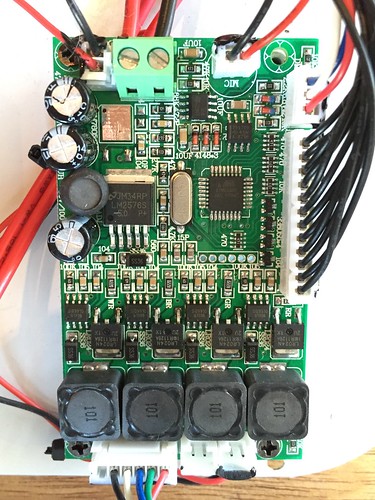
Here's the main LED driver board: the MCU is the long-obsolete Atmel ATmega8. This is very hackable: it's pin-compatible with the ATmega 328 used in the Arduino. I did not look at the output signals but it's clear there are 4 GPIO pins that generate PWM signals to control the duty cycle of the LED drivers. Those are constant-current switch-mode buck converters as indicated by the hefty inductors at the bottom of the board. Also connected to this board is a 4-digit LED display and the programming buttons accessible on the back panel. The unit came with one page of relatively useless documentation; fortunately it is similar enough to other units that it wasn't hard to find a programming manual showing how to configure the settings such as default color, master/slave, and DMX channel mapping.
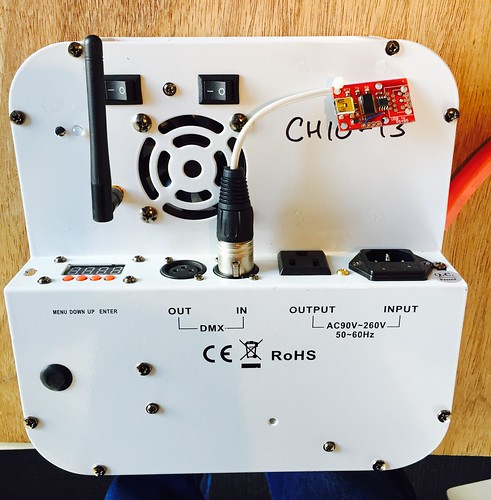
Here's the back panel, showing the wired DMX connectors, the programming buttons, the wireless DMX antenna, power inlet, and my custom DMX interface made from a USB-RS485 converter.
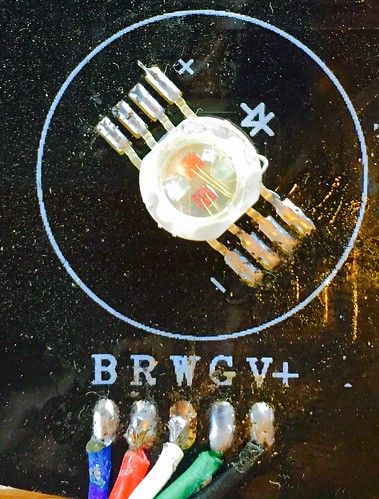
Finally, here's a closeup of one of the nine LED units, note the four LED dies (R, G, B, and Y). The wiring indicates "W" on the fourth color channel; a variation of this design uses a white LED for the fourth color channel, for brighter overall whites.
†Did you know PAR stands for "Parabolic Aluminized Reflector"? Kind of ridiculous when talking about LEDs but it's now lighting jargon and will likely stick around in the manner of other dated artifacts like "best boy."