Thursday, April 11, 2013
Art Controller Thermostat
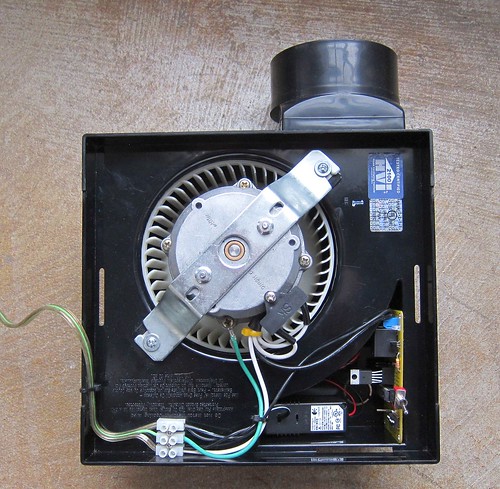
I hacked a EMSL Art Controller to thermostatically control a ventilation fan. A temperature sensor turns on the fan when the temperature rises above the set point. You can use the same hack for an electric space heater or even a sous-vide cooker by hooking up the other side of the relay, so that the heater is on when the temperature is below the set point. (I naturally disavow any liability if you burn down your house or overcook your filet mignon.)
 '
'It's pretty easy to use: the DIP switches that normally set the relay time are used for the temperature set point, in degrees Centigrade. (Though the TC74's range extends to -25 degrees C, this particular version of the code only supports positive temperature, but it would be straightforward to extend to negative ones. )
The secret sauce to this hack is the TC74 temperature sensor, which returns the current temperature in Centigrade over the I²C interface (also sometimes called the ""Two Wire Interface"). The TC74 is cheap and widely available, even if it's not the most precise or capable temperature sensor, it's a fine one to use for this purpose. Purists and accuracy freaks might want to check out the DS18b20 which is more precise at the cost of a trickier "one-wire" interface.
To simplify the TC74 wiring, I used the through-hole 5 pin TO-220 rather than the teensy SOT23 SMD version. I did some hacky things so I wouldn't need to modify the Art Controller board: in particular I connected the TC74 power and ground to the ATTiny GPIO pins (VDD on PB3 and GND on PB1) so that the sensor was powered through them. As the TC74 needs 200 µA operating current this will not stress the GPIO pins.
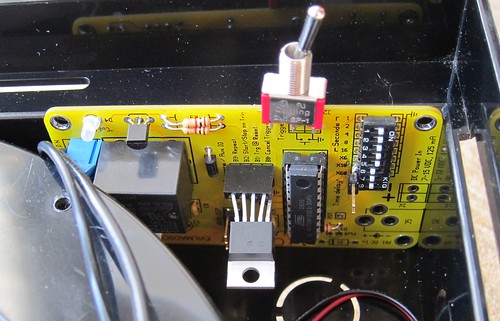
In the above image you can see the controller with the first 5 DIP switches set: this corresponds to binary 011111 = 31° Centigrade, or 87.8° F. You can set the switches to any temperature between 0 and 63° C which should be sufficient for most cooling tasks: for negative temperatures you will need to modify the code somewhat.
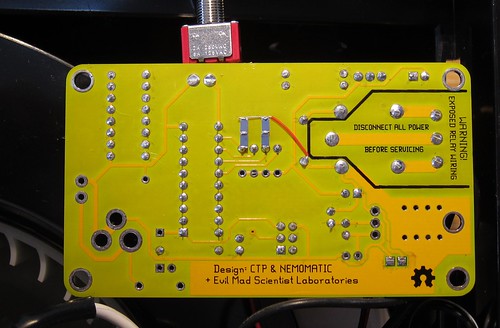
I was hoping to use the GPIO internal pullups but I wound up needing to add pullup resistors to the data and clock lines (as per the I²C specifications) to make it work. It was convenient to put SMD pullup resistors on the bottom of the board, here's a picture. (Not having 4.7 kOhm resistors handy in my stash I put two 2.2K resistors in series.)
I also programmed the "Trigger" input to bypass the thermostat and turn on the relay if desired. I soldered a toggle switch to it, but you can keep the screw terminals and run a low-voltage cable elsewhere, for example to a wall switch.
A Pro Tip here is to avoid the official Atmel TWI library, it's sadly not great. Since timing is not critical, and I wanted to use the UART for a serial debugging line, I wrote some "bit-bang" code based on this blog post by "Raul." This works fine: because you generate the clock signal, timing is not critical for the I²C bus. Plus there's the added advantage that you can use arbitrary I/O pins as I mention above. The remaining code was heavily modified from the EMSL Art Controller code, and includes a UART driver and a few low-overhead string formatting functions.
In development I printed debugging statements to the UART serial port. This needs the TX and RX pins that are on the high order bits of the DIP switch (labeled X10 and X60); naturally you will want to leave those switches open to use the serial line for debugging.
Here is the AVR-GCC firmware code on Github, adapted from the EMSL Art Controller code. Share and enjoy!